Accessory Dwelling Units · November 9, 2026 · 7 min read
Timeline to Build an ADU in Rancho Palos Verdes
Planning a guest house? Discover a realistic, phase-by-phase timeline for designing, permitting, and building an ADU in Rancho Palos Verdes.
- 5.0 on Google reviews (opens in a new tab)
- Licensed & bonded · CSLB #1130785
- Office in Rolling Hills Estates
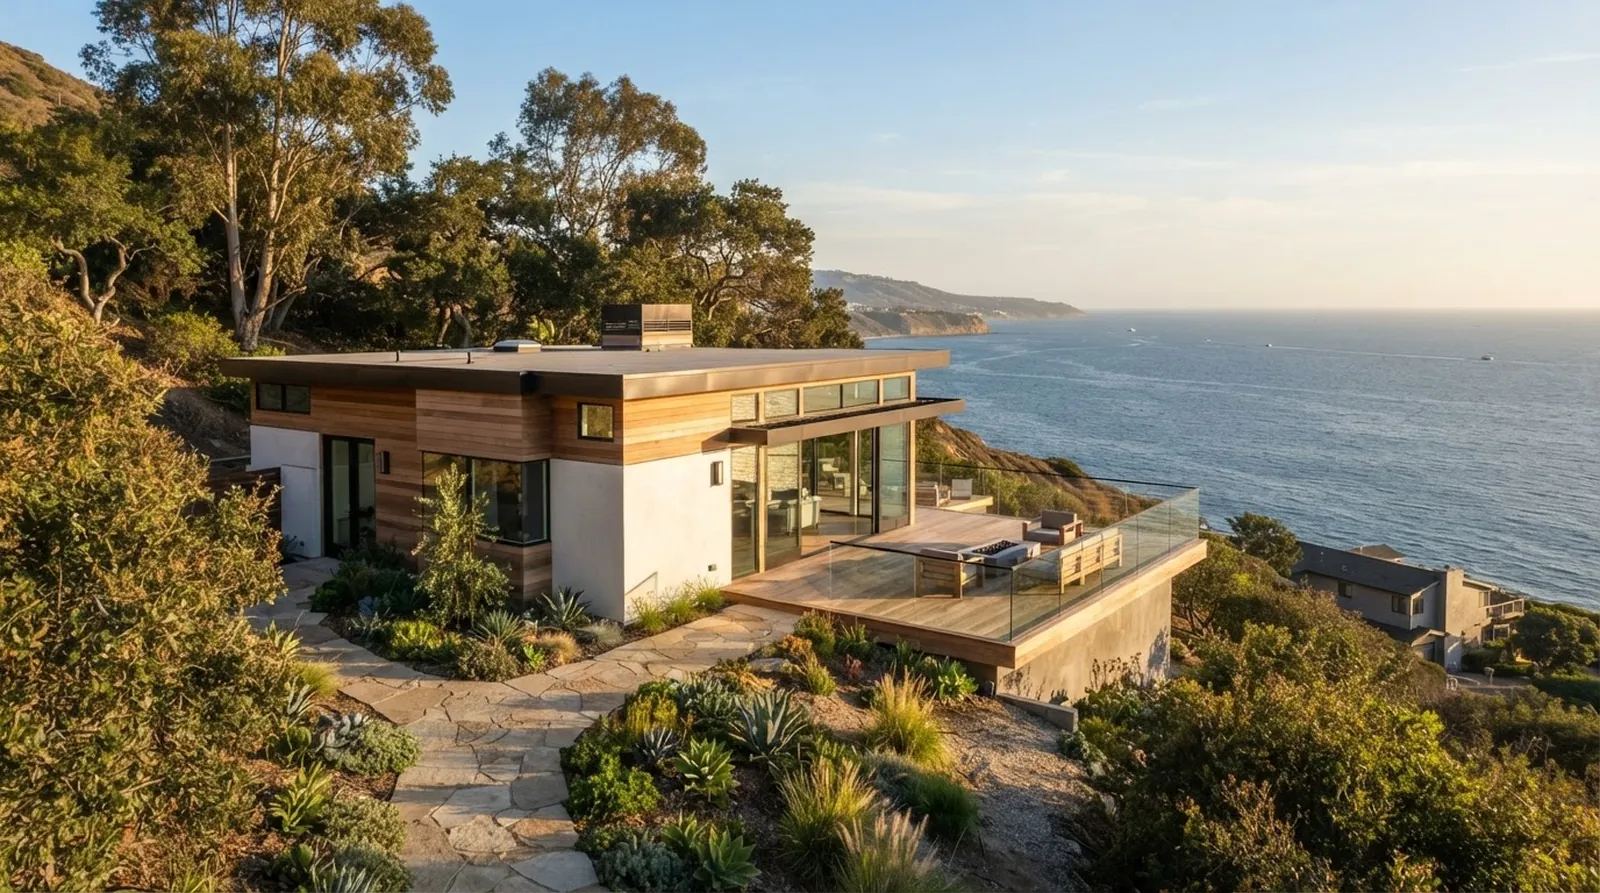
Living on the Peninsula means embracing a specific rhythm. The morning fog rolling over the canyons, the trails winding down toward the coastline, and the golden afternoon light all shape how homes sit on the land. When homeowners decide to add a detached guest house, they want a structure that feels native to this coastal environment rather than an afterthought. The architecture must respect the existing property while offering modern comfort.
Adding an accessory dwelling unit offers flexibility for extended family, a quiet studio space, or a private retreat for guests. However, turning that idea into a finished building requires navigating local regulations, architectural design, and site preparation. Homeowners often wonder about the true schedule from the first sketch to the day the doors open. They need a clear picture of the road ahead to plan their lives around the upcoming work.
Understanding the sequence of events helps set realistic expectations. A successful project relies on knowing how the design, city approval, and construction phases flow together. By breaking down the timeline into distinct phases, families can prepare for the activity in their backyard and look forward to the day they can finally use their new space.
Translating Your Vision Into Architectural Plans
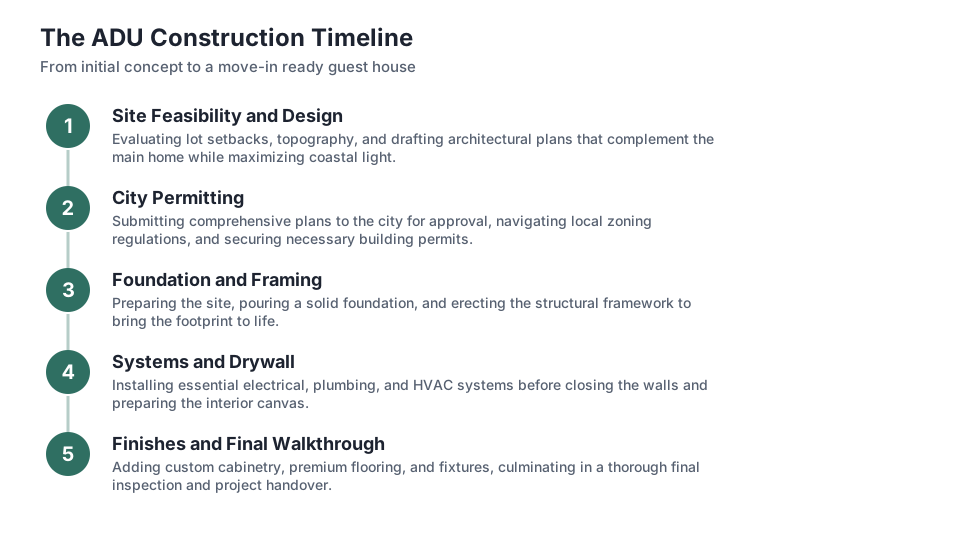
The journey begins with drafting the blueprints. During this initial stage, you sit down with architects or designers to map out the footprint, rooflines, and interior layout. The goal is to design a structure that complements your main residence while respecting property lines and neighborhood character. Every decision made here impacts the final feel of the rooms, from the ceiling height to the placement of the entry door.
Site conditions on the Peninsula often require careful planning. Sloping lots, mature trees, and specific drainage requirements mean the design team must account for more than just aesthetics. They will conduct a survey, evaluate soil conditions, and draft structural engineering plans that meet local codes. This technical preparation ensures the building will stand strong against coastal winds and seasonal rains.
This design phase sets the foundation for the entire project. Revisions are common as you refine window placements to capture ocean breezes or adjust the floor plan to maximize living space. Once the drawings are finalized and the engineering calculations are complete, the package is ready to submit to the city. Taking the time to get these details right prevents costly changes later in the process.
City Plan Review and Approval Timelines
Submitting plans to the local building department kicks off the formal review process. City planners and engineers examine the architectural drawings to ensure compliance with zoning laws, structural safety standards, and environmental regulations. This phase requires patience, as municipal departments balance multiple projects and conduct thorough reviews to protect the community standards.
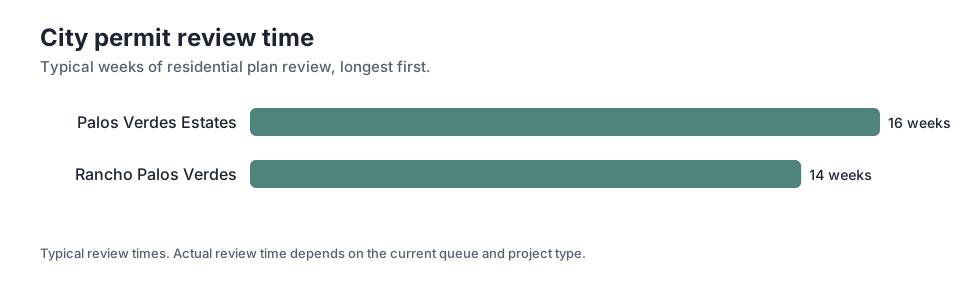
The duration of this review varies by municipality depending on their current workload and specific local ordinances. For example, you can expect 14 weeks of city plan review in Rancho Palos Verdes. In neighboring areas, the timeline shifts slightly, taking 16 weeks in Palos Verdes Estates. These durations account for initial reviews, city feedback, and the necessary revisions your design team must provide to satisfy all municipal requirements.
Understanding these administrative schedules is crucial for planning your year. While waiting for the stamped permits, homeowners can finalize their material selections, order long-lead fixtures, and prepare the site for the upcoming heavy machinery. Selecting tile, flooring, and plumbing fixtures early ensures that materials are sitting in the warehouse ready to go the moment the foundation is poured.
Preparing the Site and Pouring the Foundation
With stamped plans in hand, the physical transformation of your backyard begins. The first step involves clearing the designated area, which might mean removing old hardscape, relocating irrigation lines, or grading the soil. Earthwork on the Peninsula often requires specialized equipment to handle the dense terrain and ensure a stable base for the new structure.
After grading, the team digs trenches for the new utility lines. Plumbers and electricians lay the groundwork for water, sewer, and power connections that will tie into your primary systems. Coordinating these underground utilities is a delicate dance, ensuring that the new guest house has adequate water pressure and electrical capacity without disrupting the main residence. Once the underground utilities are inspected and approved, the foundation work commences.
Forms are built, steel rebar is tied for reinforcement, and the concrete foundation is poured. Curing takes a little time, but this solid concrete slab or raised foundation signifies the transition from dirt to a tangible structure. As a licensed California general contractor, Palos Verdes Builders builds, remodels and renovates on the Palos Verdes Peninsula, managing these critical early stages to keep the site organized and moving forward.
Going Vertical with Framing and Exteriors
Once the foundation cures, the framing crew arrives, and the building quickly takes shape. Walls go up, roof trusses are set in place, and the spatial volume of the guest house becomes apparent. Walking through the studded rooms for the first time gives you a true sense of the scale and layout, shifting the project from a paper concept to a physical reality.
Following the rough framing, the exterior shell is sealed against the coastal weather. Plywood sheathing, weather-resistant barriers, and roofing materials are installed to make the structure watertight. Windows and exterior doors are fitted into their openings, securing the building and allowing interior work to proceed regardless of the weather outside. Choosing high-quality windows helps insulate the space and frames the canyon or ocean views.
At this point, the rough trades return to snake wires, pipes, and ductwork through the open wall cavities. The local inspector will walk the site to verify that the structural framing, electrical wiring, and plumbing lines meet code before any insulation or drywall hides them from view. Passing these rough inspections is a major milestone that clears the way for the interior finishes.
Completing the Interior and Construction Phase
The interior transformation begins the moment the drywall is hung, taped, and mudded. Rooms lose their skeletal look and feel like actual living spaces with defined acoustic properties. Painters apply primer and the selected colors, setting the backdrop for the finish carpentry, baseboards, and custom cabinetry that will define the character of the rooms.
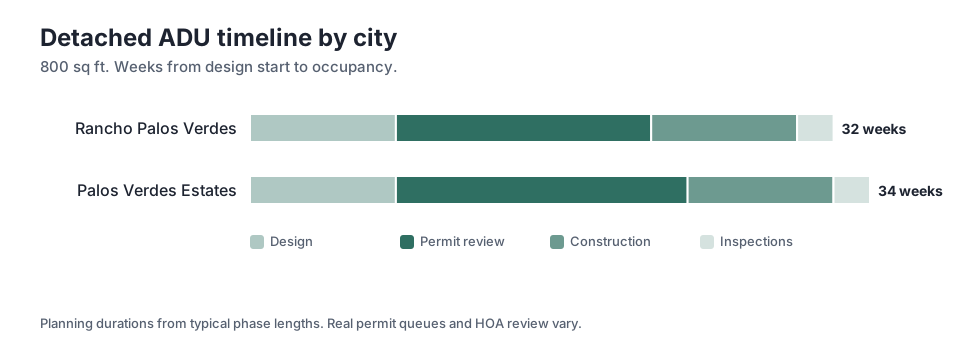
Hardwood floors or tile are laid down, followed by the installation of kitchen cabinets, bathroom vanities, and interior doors. Electricians and plumbers return for their finish work, connecting light fixtures, installing switches, and setting the sinks and toilets. The active construction phase moves swiftly here, taking 8 weeks to bring the interior from bare drywall to a polished, functional living area.
When looking at the entire schedule for a 800 sq ft detached accessory dwelling unit in Rancho Palos Verdes, the total from design start to occupancy is 32 weeks. This comprehensive timeline includes every phase, ensuring that the final product is ready for daily life. Knowing this total duration helps families plan for the arrival of guests or the transition of a family member into the new space.
Final Inspections and Move In Ready
The last hurdle before you can furnish the space involves the city building inspector. The final inspections take 2 weeks, during which the inspector verifies that all work matches the approved plans and adheres to safety codes. They check the electrical panels, test the plumbing fixtures, ensure the smoke detectors are operational, and confirm that the energy efficiency standards are met.
During this same window, the construction team completes their final walkthrough. This is the time to address minor touch-ups, adjust cabinet hinges, and ensure every surface is clean and ready for furniture. We provide estimates shown as ranges with their assumptions, so homeowners know exactly what to expect as the project wraps up and final payments are calculated.
Once the city issues the certificate of occupancy, the doors are officially open. The new structure transitions from an active job site to a quiet, functional extension of your home. Whether it becomes a home office overlooking the trails or a comfortable suite for visiting parents, the finished building represents the culmination of the careful planning and hard work.
Connecting the Guest House to Your Outdoor Living Areas
While the building itself might be finished, integrating the new structure into your existing property is the final touch. Landscaping plays a crucial role in making the detached unit feel like it has always been there. Walkways, exterior lighting, and native plantings help blend the new construction with the mature eucalyptus trees and coastal shrubs that define the Peninsula landscape.
Homeowners often use this opportunity to upgrade their outdoor living areas. Adding a small patio, a fire pit, or a pergola between the main residence and the guest house creates a shared courtyard space. This thoughtful exterior design encourages outdoor living and provides a natural transition across the property, maximizing the use of the entire lot.
Completing the landscaping also addresses any soil disruption caused by the construction equipment. Replanting the garden and laying fresh mulch or sod restores the peaceful atmosphere of the backyard. With the heavy lifting done and the greenery taking root, the property is fully restored, leaving you to enjoy the expanded living space in peace.
Key takeaways
- The timeline for a detached guest house involves distinct phases: architectural design, municipal review, physical construction, and final sign-offs.
- Municipal review times vary by location, requiring patience while city planners ensure all local codes and zoning laws are met.
- Ordering finish materials like tile, flooring, and fixtures during the permit wait time helps prevent delays once the foundation is poured.
- The transition from rough framing to interior finishes moves quickly, turning an empty shell into a functional living space.
- Integrating the new structure with native landscaping and outdoor patios completes the project, making the building feel native to the property.
Questions
Frequently asked questions
What happens during the initial design phase?
You collaborate with designers to map out the footprint, interior layout, and rooflines. This phase includes site surveys and structural engineering to ensure the plans meet local codes before submitting them to the city.
Why does the city plan review take so long?
City planners and engineers must thoroughly examine the architectural drawings to verify compliance with zoning laws, structural safety standards, and environmental regulations. The duration depends on the municipality's workload and local ordinances.
Can I order materials before the permits are approved?
Yes, the waiting period for permits is an excellent time to select and order long-lead items like windows, custom cabinets, and plumbing fixtures so they are ready when construction begins.
What is involved in preparing the site for construction?
Site preparation includes clearing the designated area, grading the soil, and digging trenches for new utility lines. This ensures a stable base and proper connections for water, sewer, and power.
When do the local building inspectors visit the site?
Inspectors visit at multiple milestones, including after the underground utilities are laid, before the foundation is poured, after rough framing is complete, and at the very end for the final certificate of occupancy.
Keep reading
Related guides
More from the same places and topics.
Cost of Premium vs. Luxury Finishes in Rancho Palos Verdes
Discover how upgrading to premium or luxury materials impacts the total cost of a whole-home remodel or addition in Rancho Palos Verdes.
How much does a home addition cost in Rancho Palos Verdes?
A comprehensive guide to the costs and timelines of building a home addition in Rancho Palos Verdes, including finish levels and permitting.
Cost to Build an ADU in Rolling Hills vs Palos Verdes Estates
Compare the costs, timelines, and planning phases for building a detached accessory dwelling unit in Rolling Hills and Palos Verdes Estates.